jaokim's blog
Software developer working on the JVM
Threading the Xena waters
In order to understand some of what Xena is up to, in the Gabrielle Examples I’ve add a utils.h include with a DEBUG function. The idea is to use one of Xena’s registers to keep track of the chip’s action, and then to utilise the XRegs command to monitor it. This is like a poor-mans way to transfer data from Xena to AmigaOS.
In this example we have a function that just loops and increments a value. This value is then displayed in r9 register.
void my_thread(int value) {
    while (1) {
        // you can see this value change with XRegs
        DEBUG("r9", value);
        value++;
        pause(PERIOD);
    }
}
If we compile and execute this we can with XRegs see what that r9 register holds.
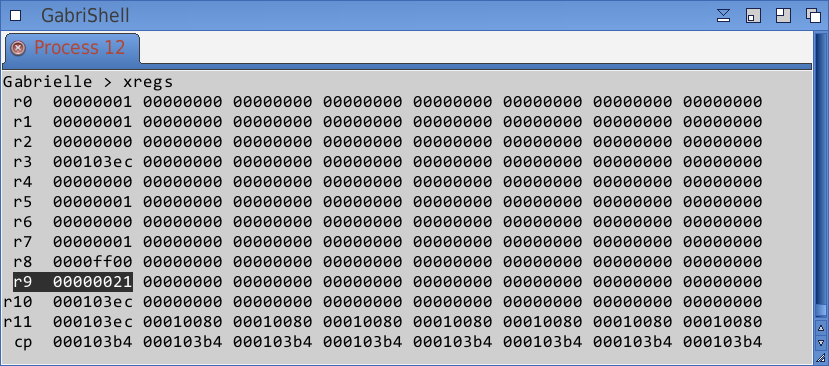
If we repeat the XRegs command the value in r9 should increase.
This fiddling with registers is a bit hackish. The DEBUG define does try to tell the compiler to not overwrite the value in the register, but it seems to not always comply with this (since we’re not doing anything with the register the compiler might optimize these things out and use the register for other stuff – not unlikely there are better ways to solve this). I’ve noticed that if you use the lower registers (r0, r1 etc) they can get clobbered with other values when viewed with XRegs. It also depends on what you actually do in the function – if you use more variables you’ll have fewer registers to play with.
So in short, do not over-use it, but it’s good to have when experimenting.
More registers
Now, as can be seen in the screengrab above there are lots of other register’s listed. What’s up with that? Well, on Xena we have 8 threads on each core, so the other columns are just the other threads.
This is also a nice segway into the par keyword in the XC language. With this we can start some parallel tasks.
int main (void)
{
  par
  {
    on stdcore [0] : my_thread(1);
    on stdcore [0] : my_thread(2);
    on stdcore [0] : my_thread(3);
    on stdcore [0] : my_thread(4);
    on stdcore [0] : my_thread(5);
    on stdcore [0] : my_thread(6);
    on stdcore [0] : my_thread(7);
    on stdcore [0] : my_thread(8);
    on stdcore [1] : my_thread(0x100001);
    on stdcore [1] : my_thread(0x100002);
    on stdcore [1] : my_thread(0x100003);
    on stdcore [1] : my_thread(0x100004);
    on stdcore [1] : my_thread(0x100005);
    on stdcore [1] : my_thread(0x100006);
    on stdcore [1] : my_thread(0x100007);
    on stdcore [1] : my_thread(0x100008);
  }
  return 0;
}
In this example we start 8 threads on core 0, and 8 threads on core 1. We start the same function but on differntr threads, each with a different start values.
When we compile and run this, we should be able to see all the threads working on their individual loops.
gabrielle TARGET=threads.xe threads.xc utils.h
XRunXE threads.xe
Running XRegs by default shows us the first core.
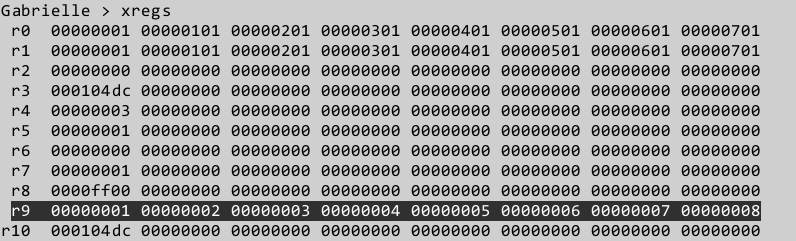
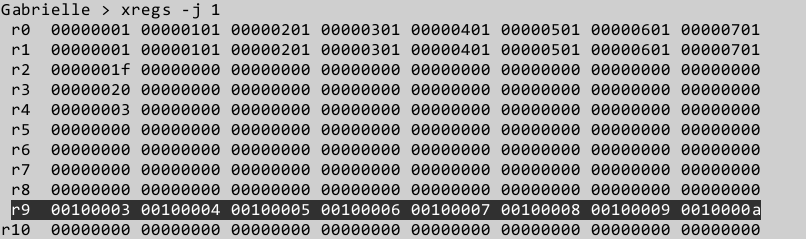
Here we see all the 8 threads having their individual values. If we want to see what the core is up to, we can use the -j option to choose which core to see.
xregs -j 1
Which will then show that it’s been working on incrementing the 0x100000 values.
Two way communication
I’ve also worked on another XTool to allow us to set a register from the AmigaOS side (might pop up in the XTools repo). As mentioned, this fiddling with registers is really a crude way of “communicating” with Xena. We’re taking advantage of the JTAG connection we have, and JTAG is really just a protocol for debugging. So we can’t expect and higher speeds. There is the localbus connection that was supposed to be used for faster communication, but that didn’t quite work as planned on the X1000. I’ll try and summarize this in a future blog post. None the less, with the XTAG and the XTools we do have means to communicate with Xena from AmigaOS. And, if amigans could use the clock port on the Amiga 1200 to create USB cards, then surely we can allow ourselves to use JTAG for… well something!
tags: Xena